Denoising: Difference between revisions
→Banding: Add an example image of processing |
|||
| Line 71: | Line 71: | ||
These settings can be played with to find the least disruptive settings. | These settings can be played with to find the least disruptive settings. | ||
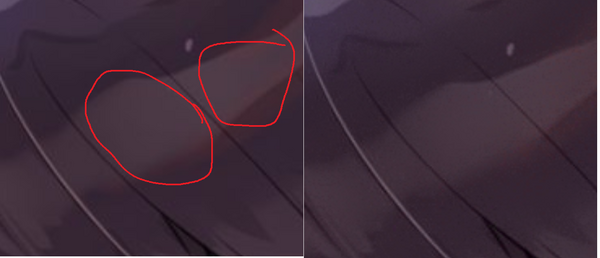
[[File:Debanding.png|600px|thumb|center|Left image show the original raw. The red highlights where the banding is most visible. The right is the output after using the ffmpeg debanding filter with default settings.]] | |||
Revision as of 23:29, 26 December 2024
Denoising is the process of removing artifacts from raws. This is only applicable to digital raws. There are several different types of artifacting that can occur, and each have their own ways of correcting the artifacting. It is also important to note that all artifact correction removes information from the raws, and thus correction should only be done if the artifacting is egregious, and only the most minimal application of correction should be applied as to not unnecessarily destroy detail.
Identification and Correction
The first step to artifact correction is identifying the type of artifact(s) the image(s) have.
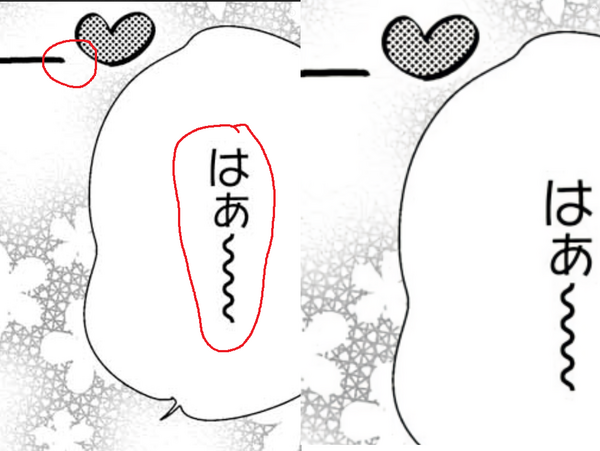
Blocking/Quantization/JPEG
This is the most common artifact seen in scanlation
Blocking artifacts, also known as quantization artifacts or JPEG artifacts, are image artifacts that occur due to the way many different compression formats split an image into discrete pixel blocks, and process each block separately. The JPEG format splits an image into 8x8 pixel blocks, then computes the discrete cosine transform of the block. This is a Fourier transform-like transformation, representing the image in the frequency domain. Then depending on the quality setting, the resulting frequency data is then divided by a matrix of constants. The higher frequency data is reduced more than lower frequency data, then the end result is rounded. This often results in a large amount of zeroes or very lower integer values in the high frequency data, which compresses easier.
The blocking artifacts occur when decoding the resultant quantized data. It is the result of one 8x8 block of pixel not smoothly transitioning to the neighboring block of pixels.
Both the easiest and highest quality (destroys the least non-artifact data) technique is to use a neural network trained for reversing this artifact.
- Download https://github.com/chaiNNer-org/chaiNNer
- Download https://openmodeldb.info/models/1x-JPG-20-40, https://openmodeldb.info/models/1x-JPG-40-60, https://openmodeldb.info/models/1x-JPG-60-80, and https://openmodeldb.info/models/1x-JPG-80-100
- These are models the correspond to the JPEG quality the image was saved with, with 80-100 meaning the image was 80% to 100% quality, and therefore it is the weakest model.
The first is a program for applying the neural network filter. The second are model that are good at removing JPEG artifacts, but also preserving other details. Most models are bad at one or both of these, while these are not.
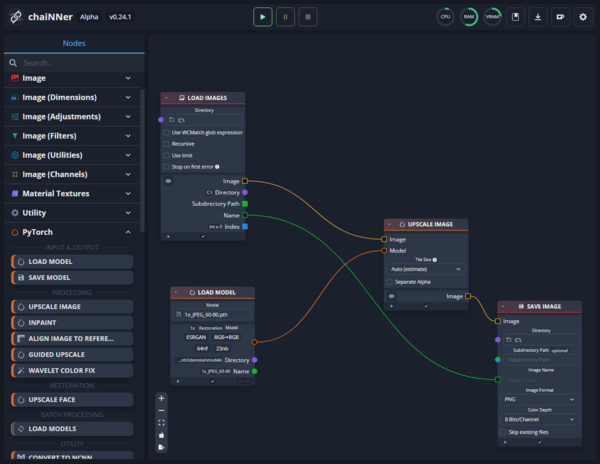
Next a filter plan must be put together. This is fairly straight-forward. Batch load the images, load the model, apply the model, then save the resultant image as PNG.

Set the directories to the input and output directories desired. Next the appropriate model must be selected. The easiest way to do this is to select a "representative" page. This page should have straight lines, text, gradients, and screentone patterns. Run only that page through the filter chain with the weakest model (80-100).
Compare the input with the output. Realize that most programs will resample the images in some way, so the way to compare is with a tool that will explicitly show the scale of the images being compared. They must be compared with a nearest neighbor or billinear resampling filter, or at 100% scaling with 1 monitor pixel corresponding to one image pixel. The easiest way to do this is with an internet browser.

If the artifacts are sufficiently removed, and the rest of the page detail is preserved, then use that model for the rest of the pages. If the artifacting remains, then move to the next strongest and compare again. If too much of the page detail is lost, then move to a weaker model, or if at the weakest already then consider not denoising.
Aliasing
TODO
Ringing
TODO
Banding
Banding is most applicable on color pages, but sometimes occurs on greyscale pages as well. It occurs on gradients with a smooth "slope." It is a type of quantization error that occurs when improperly going from a higher bit-depth, to a lower bit depth. If a value is naively truncated or rounded when going from a higher bit-depth to a lower bit-depth, a pattern will emerge in the resultant signal that is observed as banding.
To correct this error, the image must be converted to a higher bit-depth, the gradients smoothed, then the image dithered and re-quantized to the lower bit-depth. This decorrelates the values and results in the resultant signal preserving more information from the original signal. Without dithering the signal, information is lost.
But rather than doing that manually (which can be done and can have better results), the easiest way to correct banding is by using ffmpeg's debanding filter.
Note: In a proper filter chain, the image would be converted to the higher bit-depth, all other filters applied in the higher bit-dpeth (deblocking, deringing AA, resampling, ...) then the final filter applied is debanding as the image is dithered back down to 8-bits. This requires more specialized knowledge and time to setup such a pipeline.
- Download ffmpeg
- Put the ffmpeg binary's installation directory on your PATH enviroment variable if it does not automatically do so.
After following the above two steps, open a terminal and cd to the directory holding the image to be debanded.
As a start. Then compare the input and output image under nearest neighbor or bilinear resampling. This process very easily destroys a lot of detail, so pay attention.
$ ffmpeg -i image.png -vf deband out.png
To adjust the filter, the following parameters can be adjusted (with default values set):
$ ffmpeg -i image.png -filter_complex [0:v]deband=1thr=0.02:2thr=0.02:3thr=0.02:4thr=0.02:r=16:b=1:c=0 out.png
- 1thr,2thr,3thr,4thr[eshold]
- The banding detection threshold for each color plane of the current pixel. Generally R, G, B, and alpha. The valid range is 0.00003 to 0.5. This is a scale in which 0.0 is black (8-bit 0) and 1.0 is white (8-bit 255). If the difference is less than the threshold, the pixel is considered banded.
- r[adius]
- The banding detection range. If positive, a random number in the range is used. If negative the exact (absolute) value is used. It defines a range in which a square of four pixels is selected and compared with the current pixel.
- b[lur]
- Whether the pixel is compared with the average of all four of the pixels selected (the default), or if the pixel is compared with each pixel individually and only considered banded if each individual comparison is less than the threshold.
- c[oupling]
- The pixel is only changed if all color components (RGBA) are banded. Otherwise each color plane is independent of each other (the default).
These settings can be played with to find the least disruptive settings.

