Physical Raws: Difference between revisions
Initial content on how to do physical raws |
m →Skewness: Nobody :3 |
||
| (9 intermediate revisions by the same user not shown) | |||
| Line 5: | Line 5: | ||
== Preparation == | == Preparation == | ||
# If it is possible to use digital raws DO SO. Physical raws require much more effort, and the final result is lower quality. The first step is to make sure it is your only option. | # '''If it is possible to use digital raws DO SO'''. Physical raws require much more effort, and the final result is lower quality. The first step is to make sure it is your only option. | ||
# Acquire the raws. Either buy at a store, or order online. | # Acquire the raws. Either buy at a store, or order online. | ||
# Inspect the booklet, specifically how it is bound. | # Inspect the booklet, specifically how it is bound. | ||
| Line 13: | Line 13: | ||
=== Unbinding === | === Unbinding === | ||
[[File:Unbound_volume.jpg|300px|thumb|right|A manga volume after unbinding. This volume used the oven technique.]] | |||
If unbinding a volume, there are several ways to go about doing so. | If unbinding a volume, there are several ways to go about doing so. | ||
| Line 20: | Line 21: | ||
# Oven | # Oven | ||
#: This technique involves pre-heating an oven (or toaster oven) to its lowest possible setting, then placing the volume in the oven for around five minutes. After that, the glue should be very soft. | |||
This technique involves pre-heating an oven (or toaster oven) to its lowest possible setting, then placing the volume in the oven for around five minutes. After that, the glue should be very soft. | |||
# Heat gun | # Heat gun | ||
#: A heat gun or a hair dryer will work, but a heat gun will work better. TO use this technique, point the heat gun at the spine of the book until the glue is soft evenly along the spine. | |||
A heat gun | |||
# Microwave | # Microwave | ||
#: This technique involves microwaving a volume to soften the glue. | |||
This technique involves microwaving a volume to soften the glue. | |||
| Line 79: | Line 75: | ||
== Color Calibration == | == Color Calibration == | ||
The process of color calibration is a best-effort attempt at matching the color on the physical page, to the color displayed on a color calibrated screen. Scanners do capture a perfect representation of the pages, and they all must be adjusted. For grayscale pages this means adjusting the output level transfer function. For color pages this means adjusting the output curves for each color channel. This is mostly an art, but they are processes that can be used to minimize the amount of guesswork. | The process of color calibration is a best-effort attempt at matching the color on the physical page, to the color displayed on a color calibrated screen. Scanners do not capture a perfect representation of the pages, and they all must be adjusted. For grayscale pages this means adjusting the output level transfer function. For color pages this means adjusting the output curves for each color channel. This is mostly an art, but they are processes that can be used to minimize the amount of guesswork. | ||
Note that this should ideally be done using non-destructive filters. In photoshop these are known as adjustment filters. Importing the raw scan as a smart object so that it is immutable, then applying nondestructive transformations a good workflow. | Note that this should ideally be done using non-destructive filters. In photoshop these are known as adjustment filters. Importing the raw scan as a smart object so that it is immutable, then applying nondestructive transformations a good workflow. | ||
The one destructive operation that should be done is changing the colorspace of the image from RGB to grayscale if the image is RGB. This should be the very first step done when importing a scanned image. | The one destructive operation that should be done is changing the colorspace of the image from RGB to grayscale if the image is RGB and it is a greyscale page. This should be the very first step done when importing a scanned image. | ||
=== Manually === | === Manually === | ||
This should only be used as a last-resort. This is when the physical page is compared by eye to adjust the transfer functions. In the ideal case for this the user has a properly color calibrated monitor, and a lamp that outputs all light wavelength equally such as sunlight or a tungsten lamp. After that they adjust the output transfer function until the image on their monitor matches the physical page. | This should only be used as a last-resort. This is when the physical page is compared by eye to adjust the transfer functions. In the ideal case for this the user has a properly color calibrated monitor, and a lamp that outputs all light wavelength equally such as sunlight or a tungsten lamp. After that they adjust the output transfer function until the image on their monitor matches the physical page. | ||
[[File:Greyscale_histogram_levels.png|300px|thumb|right|Grayscale histogram]] | |||
[[File:Unleveled_file.png|300px|thumb|right|Raw image before leveling is applied]] | |||
[[File:Leveled_file.png|300px|thumb|right|Image after leveling is applied]] | |||
For grayscale pages there are three parameters to adjust: the blackpoint, the whitepoint, and the graypoint. The interface for adjusting this is the histogram of the image. The X-axis of the histogram is each possible pixel value from 0 to 255. The Y-axis is the number of pixel in the entire image with that value. For a grayscale image, there will often be two clear peaks: the black portions of the image, and the white portions of the image. These are spread out across several values due to imperfect scanner lighting, and sensor noise. | For grayscale pages there are three parameters to adjust: the blackpoint, the whitepoint, and the graypoint. The interface for adjusting this is the histogram of the image. The X-axis of the histogram is each possible pixel value from 0 to 255. The Y-axis is the number of pixel in the entire image with that value. For a grayscale image, there will often be two clear peaks: the black portions of the image, and the white portions of the image. These are spread out across several values due to imperfect scanner lighting, and sensor noise. | ||
| Line 99: | Line 99: | ||
== Page Alignment == | == Page Alignment == | ||
The alignment of pages is extremely critical for the cleaning and redrawing stages of scanlation. If they are not aligned properly, then the clone stamp and other tools of the redrawer may not be used as expected because they will not apply in a straight line, or screentones will not have a uniform pattern. | |||
There are several things to keep in mind for page alignment: | |||
# The manga panels are not aligned to the physical page | |||
#: This means that the straight lines in the manga itself are not aligned with the edges of the paper. Ideally they should be, but in practice they are not. | |||
# The manga panels are not skew to the scanner sensor | |||
#: This means that even if say all vertical lines are perfectly vertical, the horizontal lines may not be. It also means that a perfect square on the page will not be a square when scanned. | |||
In essence, nothing is straight. This is desirable for yuri manga, but for the realities of redrawing it can be a nightmare. | |||
As stated above, the longest straight line on a page should be aligned along the scanner axes as best a possible. Rotating a page introduces blur due to resampling that occurs, and the less the rotation, the less blurry it will be. If a page is more than 1 degree out of alignment it should be scanned again. | |||
Once again, all adjustments should ideally be done using non-destructive edits. | |||
=== Straightness === | |||
This adjustment is straight-forward. Take the longest edge of the page, and align it to its axes. In Photoshop this can be done with the ruler tool. The only tricky part is that all lines will have some slight aliasing between the line itself, and the surrounding color. Zoom in close enough to see the individual pixel, and measure between two points with identical aliasing patterns. | |||
<gallery caption="Notice how the ruler points are positioned at similar points in the aliasing pattern of the line." heights=200 mode=packed-overlay> | |||
File:LeftPhotoshopRulerStraightness.png|The left side of the ruler in Photoshop. | |||
File:RightPhotoshopRulerStraightness.png|The right side of the ruler in Photoshop. | |||
</gallery> | |||
=== Skewness === | |||
Skewness is the measure of how far off a right-angle is from 90 degree. When scanning in page, they will always have a non-zero skew. After straighten as explained above, the skew can then be corrected. | |||
# First, identify a straight line that is perpendicular to the axis that was straightened | |||
# Measure the number of pixels that the ruler move from identical points in the aliasing pattern. [[File:SkewRulerTool.png|frame|center|The ruler tool when measuring along a vertical line]] | |||
#: In Photoshop the angle measured is not precise enough as it will just report 90 degrees or something similar. | |||
# In Photoshop, go to edit->transform->skew, then click the triangle symbol. Then enter the adjustment needed. [[File:SkewTool.png|frame|center|The skew tool when adjusting the skew.]] | |||
# Remeasure and repeat. | |||
#: This is needed because unless the line is from the top to the bottom of the image, it will not have the total skew. This is why it is important to analyze the aliasing pattern of where the ruler points are applied. | |||
#: With destructive edits repeating should include undoing to the unadjusted image, then reapplying with a new total skew so that there is not accumulated error | |||
=== Automation === | |||
One can also try the tool the group Bakkin has made [https://bakkin.moe/automatic-page-straightening here]. It is a Python script that analyzes the image using the Radon transform, then report the straightness and skew, and generates a script for fixing it in GIMP. This script has mixed results, sometimes it is very good, sometimes and gives wildly off values. This varies between each page that is analyzed. Be cognizant of what transformations are applied and if the results make sense. The script also does destructive transformations, so in a non-destructive pipeline that may not be desired. Applying the transformation manually in a non-destructive fashion is possible. It outputs analysis charts that are useful for analyzing the skew and straightness of a page, the console output is a good summary of what to input for each page. | |||
It can be used by taking the console output which looks like the following: | |||
./input/tempo_rubato078.png: rotate -0.30° clockwise. Shear: 0.14° Crop: (21, 1087), (2050, 2929). | |||
> ./input/tempo_rubato082.png-skew: [90.37] - [3457.46] | |||
> ./input/tempo_rubato082.png shear_pixels: 3.58578073229851 | |||
> levels: (119.0, 243.0) | |||
> poly_area %: 85.70591382438494% | |||
The key pieces of info are the <code>rotate -0.30°</code> and <code>shear_pixels: 3.58578073229851</code> which can both be directly entered into Photoshop. | |||
Latest revision as of 01:39, 8 December 2024
Physical raws, or physical scans, are raws that are taken from real-life pages and scanned to a digital file. While the name "scanlation" is taken from this practice, it has mostly fallen out of use due to the proliferation of digital raws. This page will go over the process of how to scan in physical pages and the best practices for doing so.
Physical raws have challenges associated with them that digital raws do not. The two largest difficulties are color calibration, and page alignment. With digital raws neither are an issue since they are directly exported from the author's editor.
Preparation[edit]
- If it is possible to use digital raws DO SO. Physical raws require much more effort, and the final result is lower quality. The first step is to make sure it is your only option.
- Acquire the raws. Either buy at a store, or order online.
- Inspect the booklet, specifically how it is bound.
- The main two ways physical raws are bound is by stapling a single signature, or by gluing together many signatures into a volume.
- Decide how to scan
- There are two primary ways to scan pages. One is to crease the book open on each page, and scan the pages. The other is the remove the pages from the binding. The latter results in higher quality scans as there is zero gap between the page and the scanner surface.
Unbinding[edit]
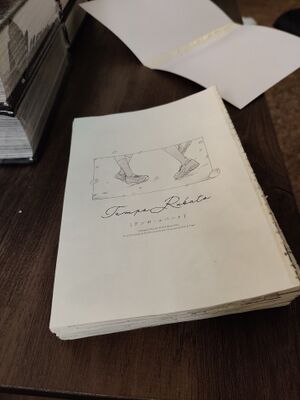
If unbinding a volume, there are several ways to go about doing so.
If it is a one-signature work, then it is most likely stapled. If that is the case, then just carefully bend the staples so they can be removed.
If it is glued, then the volume will have to be heated to soften the glue, then the pages removed. There are several ways to go about this:
- Oven
- This technique involves pre-heating an oven (or toaster oven) to its lowest possible setting, then placing the volume in the oven for around five minutes. After that, the glue should be very soft.
- Heat gun
- A heat gun or a hair dryer will work, but a heat gun will work better. TO use this technique, point the heat gun at the spine of the book until the glue is soft evenly along the spine.
- Microwave
- This technique involves microwaving a volume to soften the glue.
Regardless of the technique used, it should be noted that the glue will harden fast enough that it will need to be heated several times. Patience must be used, and care must be put in to ensure that glue does not get everywhere. When interacting with the softened glue it can and will form very thin strands, and stick to any paper is comes into contact with. This should be minimized as much as possible.
The first step is to pull the cover off. The recommended way of do this is to wait until the glue is soft, then place the spine down on some parchment paper. Then holding the cover down on the paper, pull the pages up. This reduces the chance that glue will get on the pages themselves, and the glue strings will just get on the inside of the cover.
Next, the signatures should be individually pulled apart. To do this, first identify where the signature are. They will most likely just be a glued together collection of pages, and not physically connected like a hardcover volume would be. It should be clear by looking at the spine of the pages and how they are grouped where the signatures are. Once identified, soften the glue, then with the pages on a piece of parchment paper with the last page face down, hinge the first signature up and over the spine, and pull it apart from the rest of the pages. This should prevent any glue strands from getting on the pages. Repeat this process for each signature.
Finally, the above process should be followed, except for the pages within each signature.
Scanning[edit]
The process of scanning is relatively simple, but attention to detail is required. The more effort put in to the scanning of a page, the higher quality the final result will be.
- Clean the scanning bed
- This minimizes the dust and dirt that will be scanned. This should be done every few pages. A microfiber cloth works best.
- Place the page on the scanner bed as straight as possible
- It will not be perfect, but this just minimizes the amount of adjusting needed in the next step
- Place a black piece of paper to back the page.
- This ensures that the opposite side of the page does not bleed through when scanning.
- Do a preview scan. All of the software should have a preview option available
- Identify the longest straight line in the page itself.
- Do not use the edges of the page as a straight-edge. Often pages are not aligned with the manga itself.
- Rotate the page to make the identified line as straight as possible.
- Run another preview scan. Repeat the above step and this step until satisfied.
- If a page has no straight line, use the page edges as a best-effort straight-edge.
- Set the scanning DPI to 400-600 DPI. If a color page 800 DPI can be used as well.
- Set the output to be grayscale if a grayscale page. Set the highest bit-depth that can be used.
- Crop the scan to slightly outside the border of the page. Around a 5mm margin around the page is sufficient.
- Scan to a lossless file format. TIFF is the most common scanning software supports.
Hardware[edit]
The hardware used to scan in pages is not as important as it may seem. Any scanner will do an adequate job. Get the cheapest printer/scanner combo at Wal-Mart and it will work fine. A recommendation for decent hardware is the Epson V500 scanner. This can be obtained on eBay for around $40-$50.
Software[edit]
What software is used for scanning in the pages:
- Included scanning software
- This is the scanning software that is included with the drivers for a scanner. This works, but may have some automatic corrections that are applied and unable to be disabled.
- IfranView
- This is a good piece of free software for batch scanning. Works well, the only downside is that not all scanner drivers are compatible with it. This is the first-choice if the scanner being used is compatible with it. For a scanner driver to be compatible, it must have a TWAIN API library available.
- VueScan
- This is paid software, but works well. The free version does work, but places are large watermark over the entire image, so is not usable for scanlation. The main benefit is that is uses its own custom drivers (on top of the manufacterer's hardware driver) to ensure that the output is the raw scanner output.
- Silverfast
- An alternative paid solution for scanning. There is not much reason to use this over VueScan if paying, but it also works.
Color Calibration[edit]
The process of color calibration is a best-effort attempt at matching the color on the physical page, to the color displayed on a color calibrated screen. Scanners do not capture a perfect representation of the pages, and they all must be adjusted. For grayscale pages this means adjusting the output level transfer function. For color pages this means adjusting the output curves for each color channel. This is mostly an art, but they are processes that can be used to minimize the amount of guesswork.
Note that this should ideally be done using non-destructive filters. In photoshop these are known as adjustment filters. Importing the raw scan as a smart object so that it is immutable, then applying nondestructive transformations a good workflow.
The one destructive operation that should be done is changing the colorspace of the image from RGB to grayscale if the image is RGB and it is a greyscale page. This should be the very first step done when importing a scanned image.
Manually[edit]
This should only be used as a last-resort. This is when the physical page is compared by eye to adjust the transfer functions. In the ideal case for this the user has a properly color calibrated monitor, and a lamp that outputs all light wavelength equally such as sunlight or a tungsten lamp. After that they adjust the output transfer function until the image on their monitor matches the physical page.
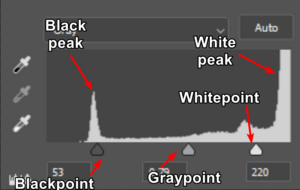
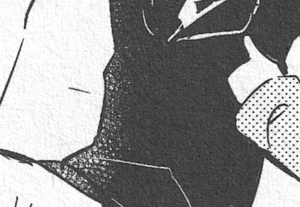
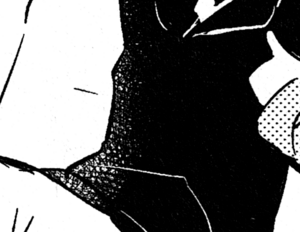
For grayscale pages there are three parameters to adjust: the blackpoint, the whitepoint, and the graypoint. The interface for adjusting this is the histogram of the image. The X-axis of the histogram is each possible pixel value from 0 to 255. The Y-axis is the number of pixel in the entire image with that value. For a grayscale image, there will often be two clear peaks: the black portions of the image, and the white portions of the image. These are spread out across several values due to imperfect scanner lighting, and sensor noise.
The white point should be on the lower side of the white peak, and the black point should be on the upper side of the black peak. Adjust these clips any value input from the raw scan above for the white point, and below for the black point, exactly 255 and 0 respectively. It is a good idea to find a page with large amount of solid black and solid white sections, as well as a large gradients. The gradients should be inspected before and after the application of the clipping operation to ensure detail is retained to an acceptable degree. It may not be perfect, but as much detail as possible should be preserved, while binning as much noise as possible from the solid sections. Comparing with the physical pages is a good idea at this stage.
To adjust the graypoint, first identify a gradient section. Then compare that gradient with the physical page. Adjust the graypoint until the relative contrast of that gradient with the surrounding details matches the physical page.
Color is much more complex. Rather than using a levels transfer function it uses a curves transfer function. This is the same concept, but allows more control on how the inputs are mapped the to the outputs.
Page Alignment[edit]
The alignment of pages is extremely critical for the cleaning and redrawing stages of scanlation. If they are not aligned properly, then the clone stamp and other tools of the redrawer may not be used as expected because they will not apply in a straight line, or screentones will not have a uniform pattern.
There are several things to keep in mind for page alignment:
- The manga panels are not aligned to the physical page
- This means that the straight lines in the manga itself are not aligned with the edges of the paper. Ideally they should be, but in practice they are not.
- The manga panels are not skew to the scanner sensor
- This means that even if say all vertical lines are perfectly vertical, the horizontal lines may not be. It also means that a perfect square on the page will not be a square when scanned.
In essence, nothing is straight. This is desirable for yuri manga, but for the realities of redrawing it can be a nightmare.
As stated above, the longest straight line on a page should be aligned along the scanner axes as best a possible. Rotating a page introduces blur due to resampling that occurs, and the less the rotation, the less blurry it will be. If a page is more than 1 degree out of alignment it should be scanned again.
Once again, all adjustments should ideally be done using non-destructive edits.
Straightness[edit]
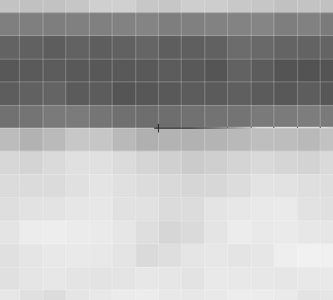
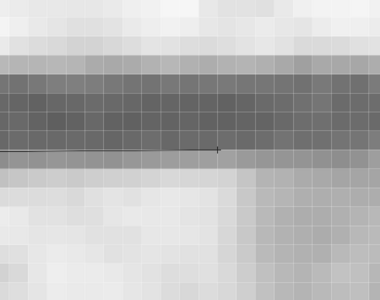
This adjustment is straight-forward. Take the longest edge of the page, and align it to its axes. In Photoshop this can be done with the ruler tool. The only tricky part is that all lines will have some slight aliasing between the line itself, and the surrounding color. Zoom in close enough to see the individual pixel, and measure between two points with identical aliasing patterns.
Skewness[edit]
Skewness is the measure of how far off a right-angle is from 90 degree. When scanning in page, they will always have a non-zero skew. After straighten as explained above, the skew can then be corrected.
- First, identify a straight line that is perpendicular to the axis that was straightened
- Measure the number of pixels that the ruler move from identical points in the aliasing pattern.

The ruler tool when measuring along a vertical line - In Photoshop the angle measured is not precise enough as it will just report 90 degrees or something similar.
- In Photoshop, go to edit->transform->skew, then click the triangle symbol. Then enter the adjustment needed.

The skew tool when adjusting the skew. - Remeasure and repeat.
- This is needed because unless the line is from the top to the bottom of the image, it will not have the total skew. This is why it is important to analyze the aliasing pattern of where the ruler points are applied.
- With destructive edits repeating should include undoing to the unadjusted image, then reapplying with a new total skew so that there is not accumulated error
Automation[edit]
One can also try the tool the group Bakkin has made here. It is a Python script that analyzes the image using the Radon transform, then report the straightness and skew, and generates a script for fixing it in GIMP. This script has mixed results, sometimes it is very good, sometimes and gives wildly off values. This varies between each page that is analyzed. Be cognizant of what transformations are applied and if the results make sense. The script also does destructive transformations, so in a non-destructive pipeline that may not be desired. Applying the transformation manually in a non-destructive fashion is possible. It outputs analysis charts that are useful for analyzing the skew and straightness of a page, the console output is a good summary of what to input for each page.
It can be used by taking the console output which looks like the following:
./input/tempo_rubato078.png: rotate -0.30° clockwise. Shear: 0.14° Crop: (21, 1087), (2050, 2929).
> ./input/tempo_rubato082.png-skew: [90.37] - [3457.46]
> ./input/tempo_rubato082.png shear_pixels: 3.58578073229851
> levels: (119.0, 243.0)
> poly_area %: 85.70591382438494%
The key pieces of info are the rotate -0.30° and shear_pixels: 3.58578073229851 which can both be directly entered into Photoshop.

